With this weeks challenge, we were asked to create a code that would simulate a dice game. Needless to say I thought this would be impossible for me, but after a little research, a few hiccups, and many nervous nights and days........I am proud to say that I finally got it to work. Below you will find my video and coding as I continue to work on the final piece of the actual data, I will post as I finish......... When working with the coding the delay originally configured was too slow for my liking and time frame to complete, so I changed it to 2000, I may change it to 1000 before I finish the other tasks for time sake.
Code
Failures/Successes
I used this video as a way to document hoe my board looked before I finally figured out how to make it work correctly. Below I completed the random trial and you will see my results in the data listed below.
Reflection: Week 4 in a nutshell left me with a great feeling in the end. Now I feel that I can conquer the world it gives me hope moving forward in the coming weeks, and possibly to use coding as a maker space in my library. My original thought of it was not to have any sort of coding going on. I am not sure if that was because of my fear with it or desire. I can truly say now that it might be an option. It has been challenging but rewarding as well.
WEEK 3 Circuit #3 RGB LED Week 3 is starting out with a bang.......I finally feel like I have accomplished something since last week I could not get my code to work. Let's hope by the end of the week I feel the same way. This week, we were given 2 builds to complete. The first was to build RGB (red-green-blue) LED. When finishing Circuit #3, I think I figured out what I did wrong on Circuit #2. My goal and plan is to go back and re-work Circuit #2 in my free time. Below is the link to my code I used. I was nervous about this part, because this is where I kept falling short last week. CODE
DIAGRAM
Picture of my board
Video of the successful completion :)
Reflection of RGB LED
This build was easier to me than the first one. Although I struggled at first, I think it was a computer issue more than a user error. After doing this multiple times on two computers at home and neither of them successful I pretty much gave up. After a good nights rest, I came to work used the computer here and BAM it worked just fine. So all in all I must say this was a pretty good build. Coding is new for me, so I am just seeing all the hurdles and trying to overcome them one by one. I will take this successful build and keep pressing.
WEEK 3 - Circuit #4 MULTIPLE LEDS
For this second build, we are connecting 8 LEDs at once and creating different light sequences. My origrinal thoughts were that this should be easy now that I have the hang of it. All in all it was, so here is my workup and videos so you can see how it turned out.
Diagram
Picture of Circuit Board
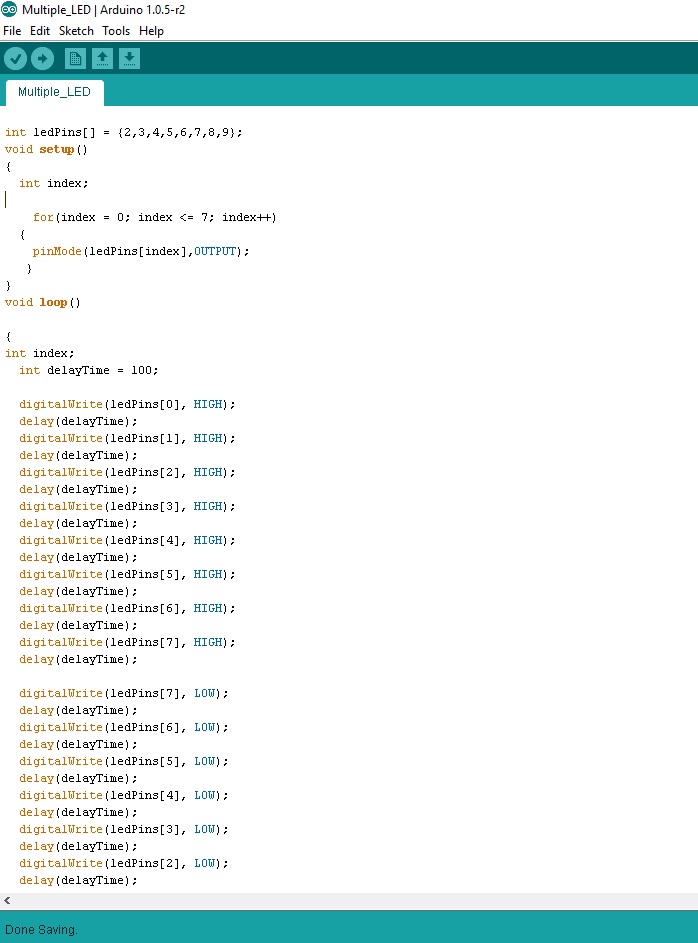
Code Multiple LED/Ping Pong
Video of my success story with this 2nd build
Reflection....... I must say this task was challenging at first. I am so proud of myself for not giving up when I was down. These tasks have challenged every aspect of my life. The good thing is that they have made me think outside the box and problem solve a whole lot. Looking forward to next week.
My goal was to start this week off a little better than last week, but reality and nerves set in and made me procrastinate until the very end.
This weeks challenge we were to use the following parts:
Potentiometer
LED
330 Resistor
6 wires
In this challenge we will work with a potentiometer. We will learn how to use it to control the brightness of and LED.
This challenge has been a frustrating one. I will document and show you my results which were unsuccessful. If you watch the video you will see how it came out. I will work on this again. First I need to take a break from it to figure out what I need to correct.
WEEK 1 CIRCUIT 1 - - - - LED Blinking Light When I pulled out the box that arrived for this class, my daughters reaction was priceless. The oldest asked "are you getting ready to build something"? and my response was YES! Needless to say they wanted to sit and watch me go through the steps. Below you will find my sketch of the diagram that goes with this first challenge.
Programming was the hardest part to me. When it comes to coding, you can miss one little strike and mess up and entire program. Below is the correct code that was used to get the light to blink.
I waited till the very end of the week to give this task a try because of the fear it has put in me. I wondered why this project made me so nervous, and I am guessing its just from the fear of the unknown, making mistakes, or totally failing at this class. After reading the instructions, I felt more confident in putting the pieces together.
When you watch the video you will see me completing the challenge again. For my nerves I must work it first to get it right then film. With the upcoming weeks, I will try and film all the error, which get hard to do when you have to record yourself. After getting the light to successfully blink I then went on to complete the circuit play.
Circuit Play I was worried that doing the play would confuse me more and mess up the success I had just felt. When I reversed the LED around the light stopped blinking. But, when moving the positive lead it does not effect the LED at all and the light still blinks. When the resistor was moved from the positive side of the LED it wouldn't work, but when it was wired from the negative side to another ground pin, it stared to work again. The last move was to move it from 13 to 12. Because of how the program is written it stopped working. In order for it to work, the program should be changed to reflect the number change. Code Play
Based off of the Circuit play if we move the pins from 13 to 12 we would need to also change the program to reflect and then it functioned correctly. Changing the delay will determine how long the LED blinks and how long it stays off. So changing it from 1000 to 2000 would take it from 1 second to 2. Changing it from 2000 to 3000 would change it from 2 seconds to 3 and so on. When you add the // in front of the codes it causes an error in the programming. The computer can't read it as a command in which we need it to function.
Wrap Up
In the end all in all it was not too bad and pretty easy to figure out following the book. Having the book made it easy as well. With the book you are able to get a visual on what the end result should look like. A lot of the things in the Code play were easy to figure out based on what we would change it to. If you have any idea of how programming works then you know when you change a code you should expect a change. I did not try the extension activity this week because of the intimidation that I felt when completing the regular task. It is my goal that as we progress through the course, I will take upon the extension challenges. I also, cannot completely say that I am ready to tackle these tasks alone, but circuit 1 has gotten me off to a good start.